Search This Blog

Thursday, November 17, 2016

Washi Dress - this muslin exceeded its intent!


What a cute, comfy dress for the Autumn events that pop-up!
Which can also be purchased at IndieSew
I finally decided to make this dress when I realized that I needed a couple easy dresses for the winter indoor concerts we have planned - something easy to wear with boots and tights, and to layer with a cardigan.  This iteration was supposed to be my muslin, but the fit was so bang-on (I didn't need to narrow the shoulder or adjust the bust!) it was a go ahead.  - I managed to squeeze all of this out of 2m of a wide chambray.

The wrinkles abound because I have worn this twice since it came off the dress form. - Suck it up, buttercup - I am here to share, not be judged.


I was new to shirring on my machine - and this was ridiculously easy.  
The pocket was AWESOME - I am on the dress pocket bandwagon.


I made my own partial lining for the bodice using the pattern pieces as the template, and ended the lining as free floating ABOVE the rows of shirring.

At the sleeves I burrito'ed the whole bit to encase the underarm in the lining.

The front was similarly lined and freefloating.  I *might* look at attaching it at the waistline next time....  I'll see.  So far it has been easy to wear.


So for those of you who question "why" I would Hong Kong this fabric - check out the fraying from it's first wash - this is under the facing.

The Guts (Note my judicious  use of leftover bias tape - and the cute bursts of colour :)


The armscye looks like this when you burrito it instead of binding it - I did the front and the back in separate stitching and folding opeations, and understitched the lining to the notches front and back (well into the part covered by the cap).


So,  so super cute!  I made a little matchy Lisbon cardigan/topper as well... and felt really youthful and comfortable in this outfit

Monday, November 7, 2016

B6244 Lisette for Butterick Cascade Front Coat

B6244 Lisette for Butterick
 Last Wednesday (!!!!) DH and I took a day off together and were out running errands - kids both in their daytime gigs meant we were f.r.e.e.   We were at the west end of town, so very close to the local Fabricland and my gallant knight encouraged me to swing by - and I dragged him in for his opinion on a "sante fe" knit so I could make an on-style cardigan.   When we walked in we found boiled wool, blanket fabric and coating on *sale* !   Stashed away in my pile of patterns I wanted to try was Butterick 6244 - so a project was born when he helped me pick out a fabric with a decent wrong side.


The pattern B6244 from Lisette is straight forward - just a single worrisome pivot at each neck/shoulder joint.  I shortened the sleeves to fit and the length by 3 inches.  I graded up much less than I used to have to (my hips are down over two inches since September) and was within the pattern measurements finally!  (I also referred to the sewalong)

I changed the hemming method to face the hem (at the same 5/8") with a ribbing I had in my stash. Using a little stretch on the ribbing only (maybe 10%?)  - I stitched it at 5/8 then flipped it to the hem side and zig-zagged the edge.  On the intersecting hems, I started a new strip with the end simply folded over and continue on my merry way.  The hem is to the outside on the neckline and front, and to the inside on the bottom edge (per the pattern).


My style sense was born in the 80's and this fabric felt so Ralph Lauren, so I added shoulder pads without a second thought.  I bound the arm hole with a double fold bias tape and used a twill tape along the shoulder and neckline seam.  


B6244 Lisette for Butterick


In the end, when I look in the mirror I am not 100% that this is the front opening for me - but it sure is easy to wear and will definitely be my go-to until the snow flies (and by which time I hope to fit nicely into my parka!)


Sunday, September 11, 2016

Cake: Endeavours - Cullottes for Sew Long Summer Blog Tour.

This morning it was 9 degrees (48F) and that was *just* a little too chilly for shorts and a tee shirt (I am Canadian).  Luckily I have been prepping for the Sew Long Summer - transitioning into Autumn - Blog Tour. 


Last Spring I found an Indie Pattern Shelf at Fabrications in Ottawa  and was BEYOND THRILLED to find a copy of the Cake Endeavour Trouser.  I quickly made up a pair of very wearable shorts and made plans to use the pattern as a wardrobe starting point - but then I decided to make a dress, and tested a few patterns and got away from my "wardrobe" plans.

So here we are - AUTUMN! and I don't need shorts.
When Melissa touched base and suggested I join the Sew Long Summer Blog tour I immediately thought of the Cake pattern.

SewManju does a lovely job styling her cullottes and I thought the look might work for me, and I had some black linen in my queue, so I decided  to give it a go.


First - let's talk about the pattern:  
FORMAT:  I am normally a pdf gal when it comes to indie patterns - we just don't have access to the gorgeous printed patterns in my neck of the woods.  I was reluctant to buy the pdf of this pattern because I had heard it was complex (but it is not, really) with many pattern pieces for different size combinations (true).

The packaging is lovely - the colour coding is valuable (don't stick to B&W if you are printing the pdf), and the printed sheet is not enormous - I imagine it will be manageable as a pdf.

SIZE RUN: Until recently - there weren't many offerings of plus size patterns in printed versions.  Cake has a nice size range (Hip measurements included: 30"-55" (76-150))  - the pattern concept is especially wonderful for a curvy body because there are grading lines for various body types and measurements.  If you are an experienced size blender it is an awesome and easy experience to grade from a 54" hip to a small waist using the pattern pieces.

INSTRUCTIONS: if you have marked your notches and know how to follow them the instructions are excellent.  StephC comes very close to beginner level instructions, but it's definitely and advanced beginner pattern.  There are a few parts to the instruction puzzle that are on the pattern pages them selves, so don't pack the pattern away after tracing until you have checked for additional info on the sheets.  There are fewer pictures than typical (more than StyleArc... but no four colour photos, for sure)


TECHNIQUE:  I particularly liked the pocket design and construction process on this pattern.
FEATURES:  The Darling Pant (there is also a Sailor Pant pattern in this offering) features an invisible zipper (easily installed above the pocket seams) and generous, slanted hip pockets.  The real perk of this pattern, is the front leg (princess?) seam on the pant and the back yoke, which allow for tweaking in the fit.  The leg is very wide, and I am told that somewher out there there are instructions for narrowing the leg pattern, but other than the mention on Flikr I have not been able to uncover an instruction set.  (Cake's  Designer, StephC is on a LOA recently and is sometimes present on these interwebs, but you are better to turn to your Facebook groups for any advice ). 

ALTERATIONS: I added 13" to the shorts length to get this cullotte.  I also did a full tumy adjustment by temporarily piceing together the front panel pieces and following Michelle's tutorial on the Curvy Sewing Collective.  I moved some of the front leg inseam to the back leg (narrowing the front crotch curve and lengthening the back crotch curve to eliminate some bunching I found when walking in my shorts - it seems to have done the trick.  Next time I will use my self-drafted shaped wastband - the pattern will accept a different wasitband easily.

And the pants themselves?
FABRIC - Delicious black linen with a viscose blend - not itchy, good body, washes well and has held it's colour very well.   I am not new to linen and canvas for multi-season wear.... it's great for when the mornings are too cool for cotton skirts, and transitions perfectly to hot afternoons.  It's dreamy and soft and warm and cool.
For the pockets, I used a knit lining I had on hand (hence, the olive) and the pocket technique that uses adhesive seam tape is really nice.
Pocket on the inside of the garment
The inside of the pocket and invisible zipper (what? you can't see it?)


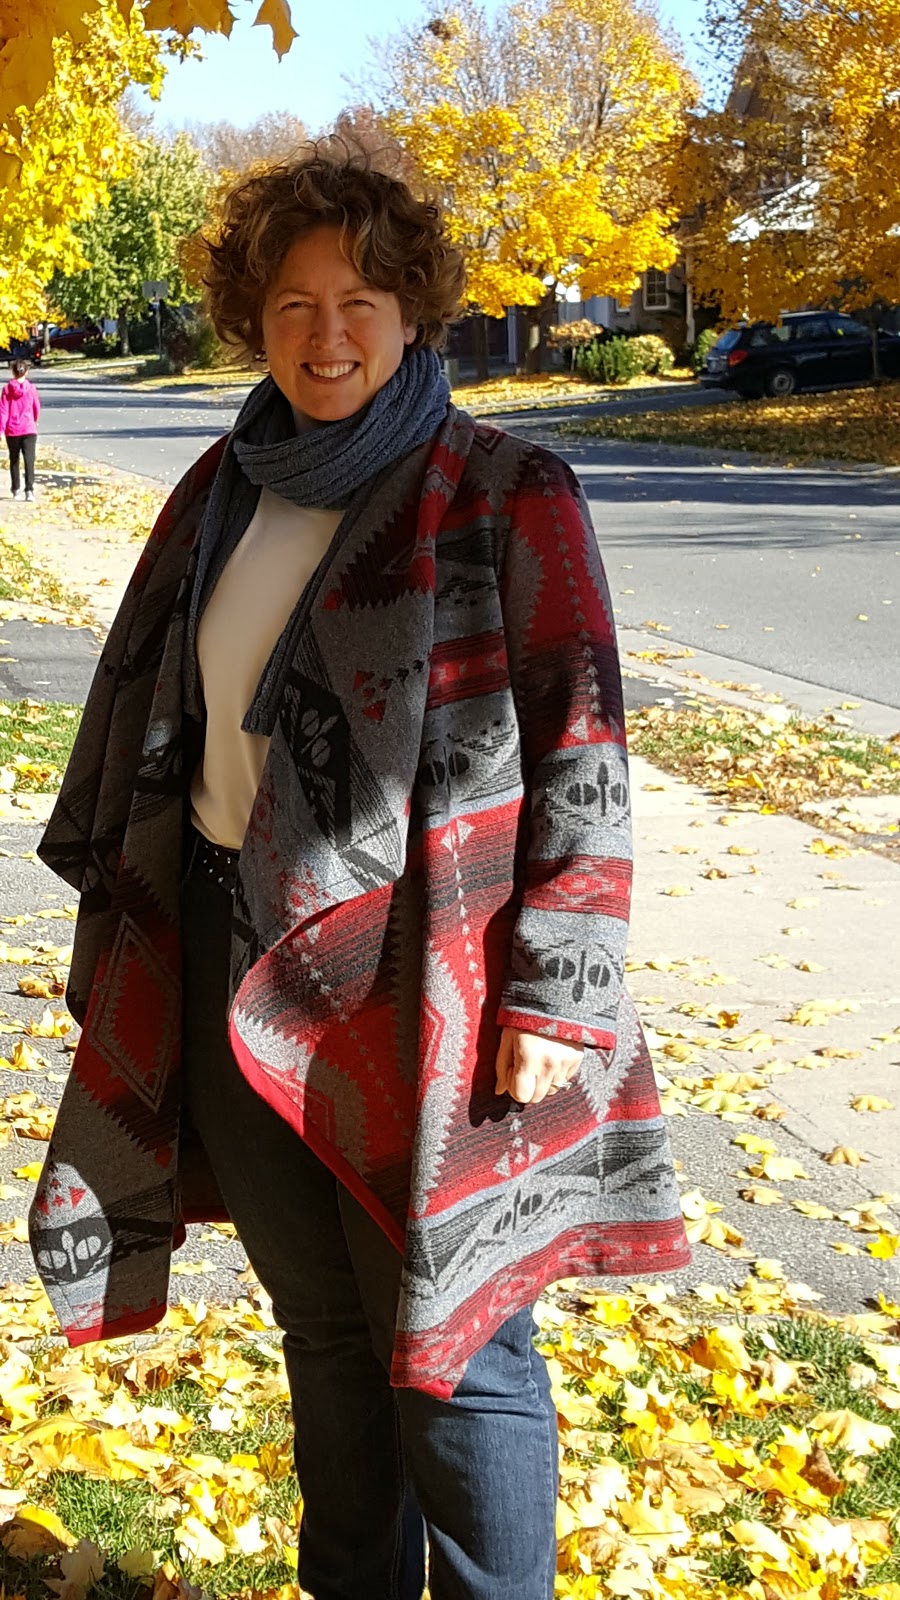
STYLING - Cullottes are quite wearable!  I love how SewManju added a boxy T or a fited jacket - I think keeping proportions in thirds work well with the short length: 1/3 top and 2/3 pants.   I am wearing my nude M7093 in these pictures - tucked in - and untucked looked nice as well.  I have a nice cropped leather jacket that looks great with these, and a pretty frilled top that works well too.  I am happiest with the way they look with a pair of MaryJanes, but if these contine to be wearable, I might try pairing with my black boots to extend their season a little.


Since this is part of a Blog Tour there are some nice perks:

Fun discounts and coupon codes from our sponsors:
Zierstoff Patterns 20% off patterns Code: zierstoffpatterns20 Ends 9/17/16 
  Blue Dot Patterns 25% off patterns Code: SewLongSummer Ends 9/17/16 
  On the Cutting Floor 50% off patterns Code: SEWLONG Ends 9/17/16 Sponsor Collage Final

The rest of the Tuesday posts are here:

Here are some of the other posts:
I will come back and update this post with the links as they are published

Monday, August 29, 2016

Latest makes (again, a catchup post)

I've been testing and doing totally non-glamorous sewing lately, but I have a few makes to share:
This M5435 hack turned out to be an easy to wear dress


This Plantain Tee for the store was a nice make- the cowl is nicely sized
I took a course in felting and made a sweet Plover

3 Felting Projects I tried on my own.

The cute little bunny!
 And the 5T Chickadee has a couple new dresses:

This is the Peppermint Swirl Dress from Candy Castle Patterns 

This is an in-progress shot of a heirloom dress
I reviewed the pattern I used for the heirloom dress here.

My next post should be up soon - I am working on some Fall sewing: Linen Endeavours and it's part of a blog tour which will appear on this blog for once.

Saturday, July 16, 2016

Next! Sewing Mojo is Flowin!

I have been sewing like crazy!   But NEXT:  I am going to go back to the Seamster Dandelion top to make a leather shell!  Here's my last (and fitting perfectly after more than a dozen washes) version:
Can you see the lovely side panel?
 It curves from halfway to center back up under the arm to a princess seam

There's a center back zip
(which I don't use in this version, but I am sure I will need in a leather version)

The fabric is gorgeous - some kind of batik on a plaid cotton


Here is my first version:  made in a cotton lawn - I put this one up at the store - I made an identical one for myself by the invisible zipper ate the lawn on my first zip - I immediately went out an bought a proper invisible zipper foot.  These shots show the design lines nicely.


the curved side panel shows up well on this shot

So - what else have I sewn?
I made a BBQ shirt for my DH using the bits from a shirt we ordered online  (apparently an XXL for a child)
 -I think the main fabric is a Kaufman Interweave chambray (pepper? I think) - I bought a remnant.


My friend gifted me some crazy poly-knit, I love it!  So I made (another) Lisbon Cardigan


Here's another one I didn't blog from May (apparently that was my last haircut!):

I made a Plantain Tee out of a gorgeous Rayon jersey from my Nature's Fabrics prize pack

Plantain Tee
And - a Sophie Swimsuit that I will blog when I make one from the finalized pattern
Sophie Swimsuit
Today I will finish this dress.  I totally messed with a woven pattern to make a knit version of view C

phew!  two weeks of holidays, then I will tackle the leather shell - do you think denim will make a good test run?